If a water heater leaks, it’s probably time for a replacement. However, a simple repair might be enough to keep it functional.
Homeowners who feel comfortable working on plumbing parts might be able to replace the thermocouple or dip tube. However, they should never attempt a gas valve repair without the help of a professional like Hot Water Now.
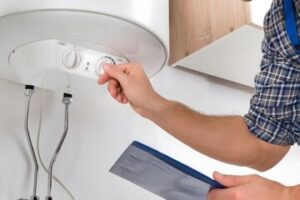
The Thermocouple is one of the most important components of your Water Heater, as it ensures that your pilot light stays lit. A good working thermocouple will create an electrical current to the gas valve when it senses that the pilot flame is lit, which in turn will keep the gas flowing to your heater and allowing it to work properly. Unfortunately, this little device can go awry due to a number of issues, including buildup of carbon which insulates the metal causing a drop in voltage, or oxidation or even metal fatigue. In either case, the best way to fix the problem is to replace the old Thermocouple with a new one.
This can be a difficult project, and it is recommended that you seek the assistance of a professional for this task as it involves working with gas that is very flammable. First, shut off your gas supply and let the unit cool before starting work on it. Then, disconnect the metal housing from the wall and remove the nut and screw that hold it in place, being careful not to damage the junction box in doing so. Once the housing is removed, you can then begin working on removing the wires that are attached to it.
Once you have all the wires disconnected, you can then begin the process of replacing the Thermocouple. The simplest method is to simply replace the old one with a new one, though you will need to note how it is mounted and the location of the connectors so that you can get your replacement in correctly.
Thermocouples are inexpensive, so it’s not a bad idea to have a spare on hand in case of an emergency. They can be found online, and many home supplies stores sell them as well. In the long run, a functional thermocouple can significantly improve your Water Heater’s performance and safety.
If yours is not working, you should be able to tell by noticing that your pilot light no longer stays lit. It may also be that your water heater isn’t heating your water, or it’s displaying other signs of malfunction.
Element
The heating elements are a crucial component of the water heater. They are responsible for heating the water, but they can burn out over time. If you notice that your hot water is running out faster than it should, then this could be a sign that one of the elements has burned out.
Whether you have an electric or gas water heater, the element will need to be replaced at some point. A professional plumber will be able to identify the exact problem and recommend the best replacement options. They will also know what safety protocols to follow when dealing with high temperatures and pressure. A professional plumber can save you a lot of money in the long run by providing an accurate diagnosis and avoiding costly mistakes.
If you do decide to replace the heating elements on your own, it is important to choose a replacement that matches the length, mount type (screw-in or flange), and wattage of the old one. You can find these at your local hardware store. It is also recommended that you purchase a non-contact voltage detector to help you avoid getting shocked. Make sure that the fuses in your breaker box are off before you try to touch any of the screws on the front of the heater element.
Another thing to keep in mind is that the dip tube can also wear out over time. This tube transfers cool water from the top of the tank down to the lower element so that it can be reheated. If the dip tube is worn out, it can cause cold water to mix into your hot water, which can decrease the overall temperature.
The pressure valve is a small part that helps to release excess pressure from the water heater. Sometimes, this part can become worn down, which means that your water heater may leak. This can be a huge problem and should be fixed as soon as possible. This is another part that should only be replaced by a professional, as it can be very dangerous if you try to do it yourself.
Dip Tube
The Dip Tube is one of the most important components in your water heater, ensuring a consistent supply of hot water. It works by pushing cold water down to the bottom of your tank, keeping it from mixing with the hot water that rises up out of your faucets. A broken dip tube can lead to a lack of hot water in your home. Luckily, replacing the dip tube is relatively simple and can be done by any homeowner with a little patience.
In order to replace the dip tube, you must first shut off your power to your water heater. You can do this by switching off the circuit breaker for an electric water heater or turning off the gas control dial for a gas heater. After this, you will need to drain your water heater. You can do this by connecting a garden hose to the drain valve located at the bottom of your water heater and running it outside or to another drain. Once the tank has drained, you can disconnect the cold water pipe from the dip tube inlet and remove it using a flat screwdriver.
You will then need to replace the new dip tube, making sure that it is made from durable materials like cross-linked polyethylene (PEX). Simply drop the new tube into the cold water inlet and connect it to the inlet nipple by loosening the connector and nipple with a wrench and turning counterclockwise to remove them. Once the new dip tube is installed, you can reconnect the cold water inlet and restore power to your water heater.
Replacing a dip tube can be a great option for Water Heater Repair, especially if the issue idz early on and is isolated to a single unit. However, if the water heater idz aging or you have frequent issues with the dip tube, it might make more sense to invest in a new water heater that is energy-efficient and will likely last longer than your old model.
Pressure Valve
As the name implies, a pressure-relief valve releases excess water and steam from inside your tank in the event of a thermal expansion of your hot water. It’s also a safety mechanism that prevents the water heater from bursting or leaking, and helps to protect your home from flooding. It is a required component of all standard water heaters and some tankless ones.
The temperature-and-pressure relief valve (T&P) is typically connected to a pipe that runs downward, terminating a few inches above the floor. It is designed to open when the pressure reaches a certain level and the temperature reaches 210 degrees Fahrenheit, or when the pressure reaches 150 psi.
It’s a good idea to periodically test your T&P valve and make sure it works correctly. A faulty T&P valve could result in a burst water heater, and is a significant health and safety risk to your family.
Testing your T&P valve is relatively simple, and can be done without increasing the temperature or pressure of your water heater to unsafe levels. First, position a bucket or other container under the discharge tube to catch the water that is released when the valve opens. Then, carefully lift up on the lever of the valve and listen for a rush of air and water flowing into your bucket. When you release the handle, it should snap back down and shut the valve.
This is a simple, cheap test that most homeowners can do themselves. However, it is important to wear closed-toe shoes and gloves to avoid scalding water. You should also always be careful not to damage the discharge tube or valve when you’re lifting it up and down.
While most homeowners don’t think about their water heater very often, it’s crucial to perform these routine tests and maintenance on a regular basis. It is recommended that you test your T&P valve twice a year, and drain and flush the tank at least once per year to remove minerals and sediment. If you’re unsure how to properly test and care for your water heater, contact us to schedule a VIP plumbing inspection today!