Plumbing is a complex system that delivers fresh water and removes wastewater from your home—understanding how your plumbing works can help you make the right choices for your home improvement projects.
Plumbers in Lexington consist of the pipes and components that supply water, drain wastewater, and vent air. During the rough-in plumbing phase, plumbers install these main pipes before the walls are closed.
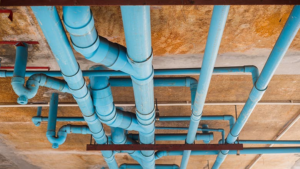
The plumbing system in any building is a network of pipes that delivers water for use and removes waste. It is vital for life and work in buildings to ensure that the building has clean water for drinking, washing, and cooking, as well as disposing of sewage properly. A faulty plumbing system can lead to health and safety issues, so it is important to keep it in good condition. Plumbing work can include anything from repairing a faucet to installing a new shower. There are many laws and regulations that govern plumbing, so it is important to know how to perform plumbing work safely.
The first step in any plumbing installation is laying out the supply and waste lines. This process includes trenching and laying out the pipes, connecting them to the main pipe, and testing for leaks. Plumbers must follow local and state plumbing codes when performing this stage of a construction project.
Once the supply and waste pipes are in place, the plumber can install drain fittings and toilet flanges. The rough-in phase also includes determining the locations for sinks, tubs, and showers. This is important because these areas need to be accessible once the drywall is installed. The plumber must also install a stack that will carry the waste pipes to the sewer or drain line.
Plumbing is a complex and essential part of any construction or renovation project. It involves working in tight spaces and using specialized tools and equipment. A professional plumber will have the skills and experience to complete the job quickly and efficiently. They will also be able to diagnose any problems and provide advice on how to fix them.
If you are constructing a new home or renovating an existing one, it is important to hire a professional plumber for the plumbing. They will ensure that the installation meets all local and state codes, and will provide you with a quality service that will last for years to come. A plumbing contractor will be able to recommend the best piping, valves, fixtures, and materials for your needs and budget.
The drain of a plumbing system takes wastewater and other waste liquids away from the fixtures, funneling them into the sewer line. Generally, this is done under the lowest level of the structure or in a septic system.
A drain can be open or closed, passive or active. Passive drains rely on gravity, body movements, or pressure differentials to move fluid or gas. Active drains use intermittent negative pressure or constant suction to remove waste liquids.
When a plumber installs drain lines, they must be carefully placed to avoid problems down the road. For example, a water pipe should not cross over a vent line, which can create a backpressure that prevents the pipe from flowing properly. This could result in water leaking from the fixture or from the wall, which can lead to expensive repairs.
Another important consideration when installing drain lines is ensuring they slope properly. A drain line should slant down at about 1/4 inch per foot. This ensures the line will not become blocked by soil or other debris, which can happen if the line is not sloped correctly. It is also important that the bends in a drain line are smooth and not angled sharply, as this can also cause a buildup of debris.
In addition to proper slope, drain lines need to be well-ventilated. This will help prevent a condition called air lock, which can cause the drain pipes to fill with water. Venting the drain lines will also help keep water warm and reduce the risk of freezing in cold climates. If you have multiple drains in close proximity, they may be able to share the same vent line, provided it is large enough.
Once the water and drain lines are installed, the plumber can move on to the rough-in phase of the plumbing process. This involves putting in the sewer accommodation stubs, which connect the house to the main sewer line. It is important to set these properly, as improperly-installed stubs can cost thousands of dollars in repairs later on. It is also essential to have the correct connections between rainwater and wastewater pipes. The wrong connections can cause flooding, mold, and other serious issues.
A plumbing vent, also known as a pipe stack, equalizes air pressure in the drain pipes and lets sewer gases escape from the home. It’s usually located on the roof and directed above the house to prevent odors from entering living areas. The vent system also removes water vapor from the drainage lines, which helps the drains work efficiently.
A vent should be made of a material that won’t degrade under normal conditions. The pipe should be large enough to allow air to move freely through it. A vent that’s too small will clog easily, leading to plumbing problems. In addition, it should be properly installed and free of obstructions.
Plumbing vents are important, but they can be easy to overlook unless you own a home. Understanding these sensitive aspects of your home’s plumbing can help you keep your budget intact and your anxiety levels low when an issue arises.
Your home’s drain pipes need air to move waste and water through them, but this isn’t always easy to do in a tight space. The vent system ensures that your plumbing system doesn’t fill with water and waste by drawing air from outside, so it should be free of obstructions and properly positioned.
Vents are often a victim of blockages, as they’re exposed to the elements and make attractive nesting sites for birds and rodents. They can also be blocked by tree branches, leaves, or dirt. A vent that’s blocked will cause your drains to overflow or back up, and it can even lead to a complete drain failure.
In addition, if you hear gurgling sounds from your toilets or notice a strong sewage smell in your home, you might have a vent blockage. If the problem isn’t resolved, it could result in sediment forming inside your drain pipes, which will lead to further problems and hefty repair or replacement costs down the line.
It’s possible to perform simple maintenance on your plumbing vent, but a professional plumber is best for ensuring that it’s in good working order. An experienced plumber will check that the length of the vent meets local codes and makes sure there are no obstructions, such as critters’ nests or tree branches. The plumber can also repair the vent to prevent a build-up of ice and snow.
Plumbing fixtures are the components that supply water and remove wastewater from a building. They are also responsible for ensuring that buildings remain hygienic and safe. Without plumbing fixtures, it would be impossible to wash hands, cook food, or clean surfaces. There are many different types of plumbing fixtures available on the market, so it’s important to choose ones that will meet your specific needs and budget.
When choosing plumbing fixtures, it is important to consider factors like price point, design, and functionality. It is also important to choose fixtures that are compatible with your existing plumbing system and will comply with local plumbing codes and regulations.
In addition to determining the type and size of plumbing fixtures, you must also decide whether or not to use a toilet tank. While some people prefer the look of a toilet tank, others find it to be unsightly and inconvenient. Regardless of your preference, it’s important to keep in mind that your toilet tank will need to be vented.
Venting is the process of allowing air into a drain line to break up solid waste and help water flow more easily. All toilets, sinks, and tubs that discharge wastewater must be vented. This is important because it prevents a vacuum from forming in the drain lines, which could lead to clogs and other problems. Ideally, each fixture should be located within five feet of the vent stack.
Another consideration when choosing plumbing fixtures is whether or not to install a septic tank and sewer line. Septic tanks are designed to separate solid and liquid wastes, and they are a critical part of a home’s plumbing system. When installing a septic tank, it is necessary to have a permit and follow all local and state laws regarding septic systems. In addition, septic tanks must be buried at least 6 inches below the surface of the ground.
Before starting your plumbing project, it is important to understand the different parts of a plumbing system. This will allow you to make informed decisions and ensure that your plumbing is installed correctly. In addition, understanding how plumbing works will help you avoid costly mistakes and rework in the future.